

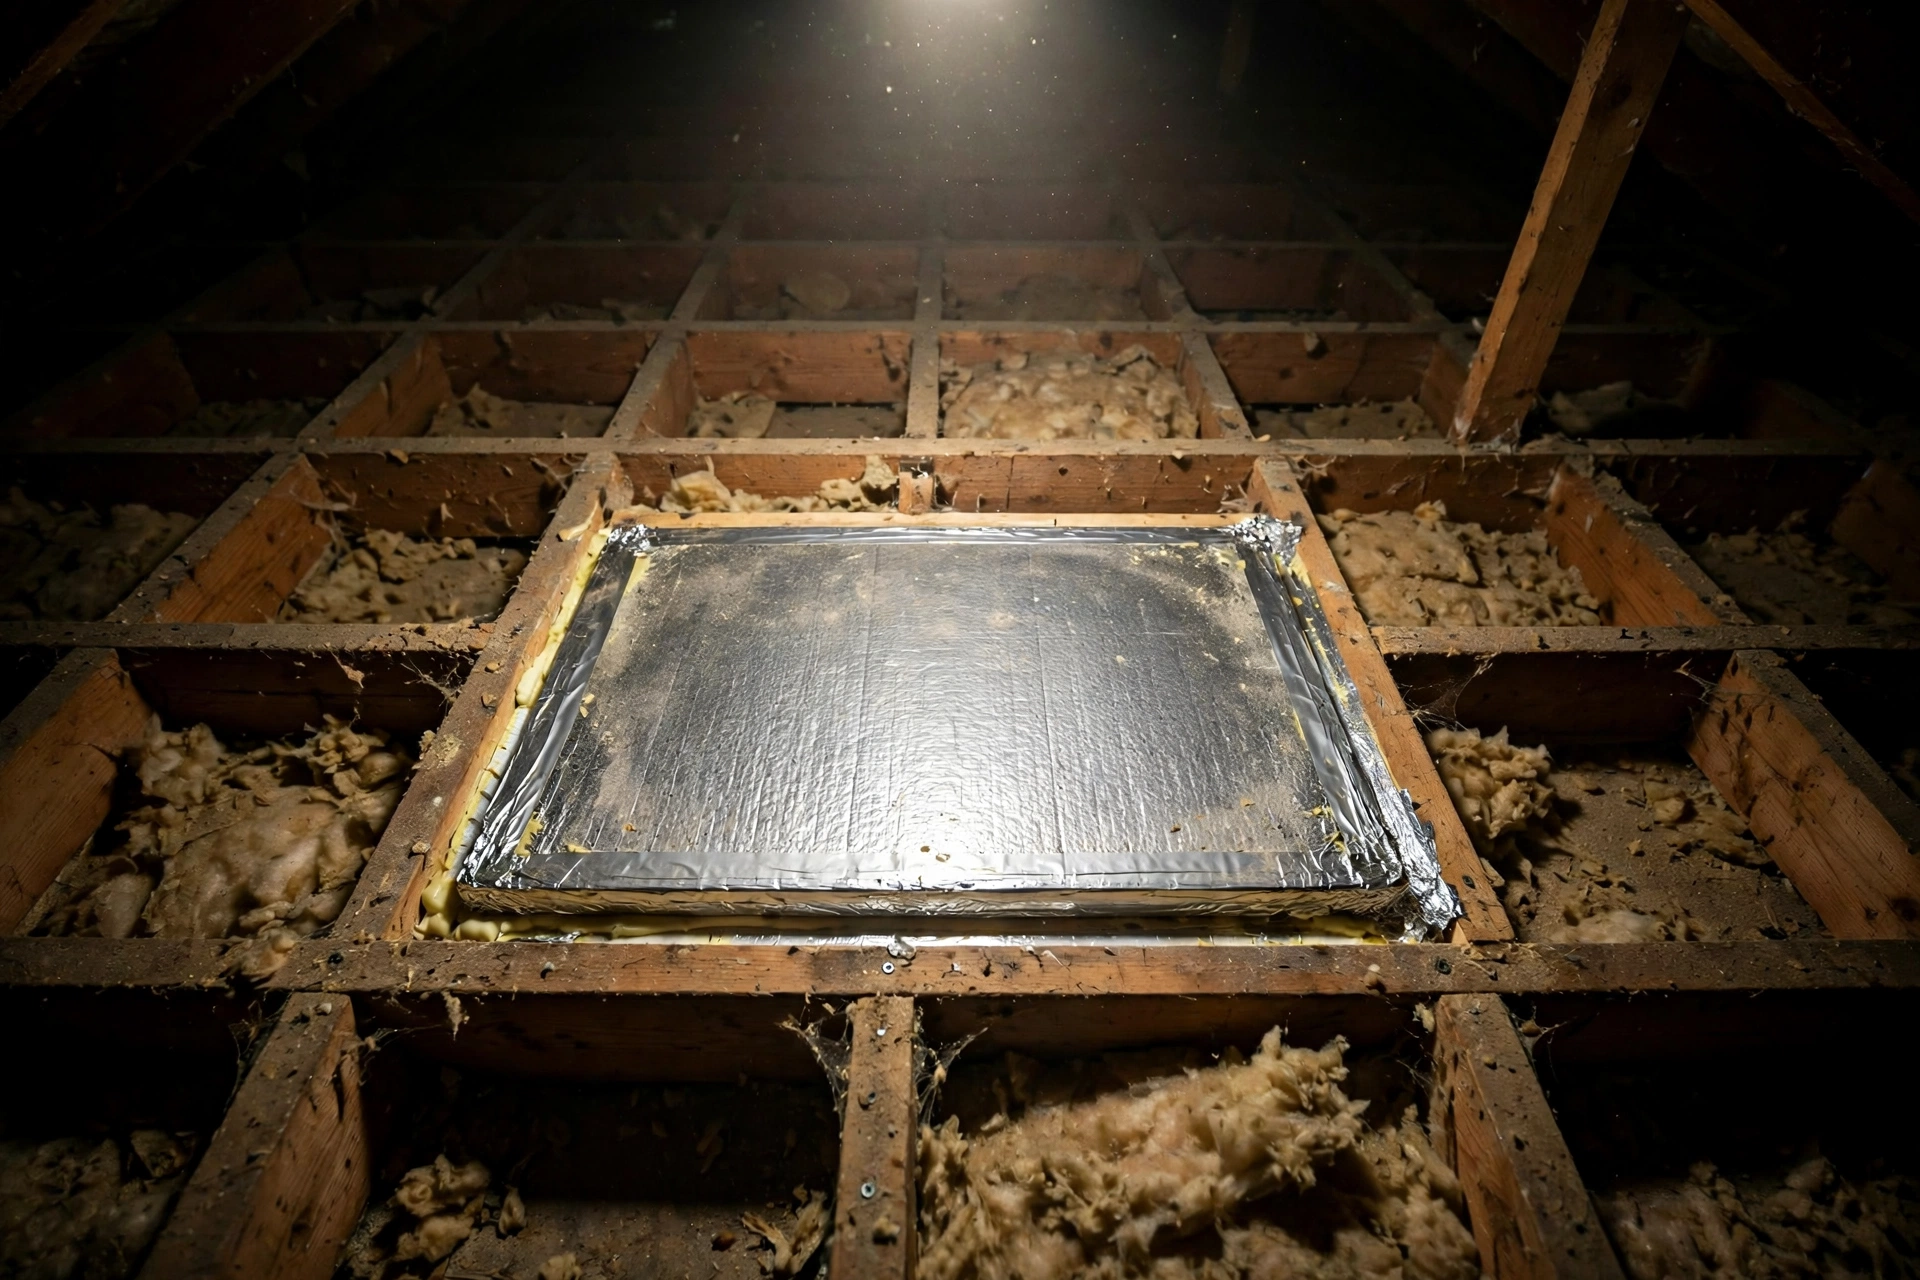
Here’s an uncomfortable truth about most American attics: you can have a foot of pristine insulation up there and still be heating the neighborhood, all because of a two-by-three-foot square of bare plywood in your hallway ceiling. The attic hatch — that pull-down panel or scuttle-hole cover you climb through to reach the attic — is routinely the worst-insulated square footage in the entire house.
It makes sense when you think about it. Insulation contractors blow or lay insulation across the attic floor, but they can’t bury the access hatch — you still need to get up there. So the hatch stays bare, or gets a token scrap of insulation that falls off the first time someone opens it. The result is a thermal hole right in the middle of your ceiling, leaking warm air all winter and letting hot attic air press down all summer.
The fix is one of the cheapest, fastest energy upgrades you can do: insulate and weatherstrip the attic hatch properly. It takes about an hour, costs very little, and closes a gap that undermines the rest of your attic insulation. Let’s get into it.
Table of Contents
- Why the Attic Hatch Matters More Than You Think
- What Type of Attic Access Do You Have?
- What You’ll Need
- Step 1: Measure Your Hatch
- Step 2: Air-Seal the Opening
- Step 3: Insulate the Hatch Panel
- Step 4: Weatherstrip the Frame
- Step 5: Test and Finish
- Insulation Options Compared
- Pro Tips
- Common Mistakes
- Frequently Asked Questions
Why the Attic Hatch Matters More Than You Think
Heat rises. In winter, the warm air you’re paying to heat migrates upward, and the attic hatch is often the path of least resistance — an uninsulated panel with gaps around its edges, sitting directly between your heated living space and a cold attic.
Energy auditors have a term for this: the “thermal bypass.” Your attic might be insulated to a respectable level everywhere else, but air leaks through the hatch framing and conducts straight through the bare panel. In energy terms, a single uninsulated hatch can waste as much heat as a much larger area of thinly insulated ceiling. It’s a small hole with an outsized effect.
The summer story is the mirror image: superheated attic air (attics routinely hit 130°F or more on sunny days) radiates down through the uninsulated hatch, warming the hallway or bedroom below and making your air conditioner work harder.
This project pairs naturally with other envelope improvements. If you’re working through your fall home maintenance checklist, the attic hatch is the highest-return hour you can spend — and it complements bigger-picture energy-saving upgrades that cut your bills month after month.
What Type of Attic Access Do You Have?
The insulation approach depends on your access type:
- Scuttle hole — a simple removable panel (usually plywood or drywall) sitting in a framed ceiling opening, often in a hallway or closet. Most common in older homes. Easiest to insulate.
- Pull-down stairs — a folding stair unit with a large insulated-or-not door panel. Common in newer homes and garages. Needs insulation on the back of the stair door plus sealing around the frame.
- Knee-wall door — a small vertical door in a finished attic or upstairs wall. Treat it like an exterior door: insulate the door and weatherstrip the frame.
This guide focuses on scuttle holes and pull-down stairs, which cover the vast majority of homes. Knee-wall doors follow the same principles — insulate the panel, seal the edges.
What You’ll Need
- Tape measure — to size the hatch and cut insulation
- Rigid foam insulation board — 2-inch polyisocyanurate (polyiso) or extruded polystyrene (XPS); foil-faced polyiso is the best choice for this job
- Foil tape (not duct tape) — for sealing foam board edges
- Construction adhesive or foam-board adhesive — to bond insulation to the hatch panel
- Self-adhesive foam weatherstripping — for sealing the frame; get the compressible type
- Caulk — to seal gaps between the hatch frame and the ceiling drywall
- Utility knife and straightedge — for cutting foam board
- Work gloves, dust mask, safety glasses — attic work basics
- Headlamp or flashlight — attics are dark
Optional but nice: a can of spray foam for larger gaps around the frame, and a pre-made attic stair insulation cover (a “tent”) if you have pull-down stairs and want the easy route.
Step 1: Measure Your Hatch
Climb up (carefully — step only on joists or the hatch frame, never on bare drywall) and measure the hatch opening from inside the attic, plus the dimensions of the hatch panel itself. Write both down. Note the clearance above the hatch too — you need enough room for the insulation thickness you add without it jamming against roof framing.
While you’re up there, look at the current state of things. Is there any insulation on the panel? Is the frame sealed to the drywall, or can you see gaps? Most hatches fail in both areas — no insulation and no air sealing — so expect to fix both.
Step 2: Air-Seal the Opening
Insulation without air sealing is like wearing a down jacket with the zipper open. Before adding any insulation, seal the air leaks:
- Caulk the frame-to-drywall joint. Run a bead of caulk where the wooden hatch frame meets the ceiling drywall, all the way around. This is a notorious leak point.
- Spray-foam larger gaps. If you can see daylight or feel drafts around the frame, fill gaps wider than about a quarter inch with expanding spray foam (use the low-expansion “window and door” type so you don’t bow the frame).
- Check from below too. Have someone shine a light from the attic while you look from the room below — any light coming through is an air leak to seal.
Air sealing is the unglamorous half of this job, but it delivers roughly half the benefit. Don’t skip it.
Step 3: Insulate the Hatch Panel
Now build up insulation on the attic side of the hatch panel. The goal: get the panel’s insulation value close to the rest of your attic floor.
For a scuttle-hole panel:
- Cut a piece of 2-inch rigid foam board to match the panel size (or slightly smaller so it fits through the opening).
- Glue it to the attic side of the panel with construction adhesive. Weigh it down or brace it while the adhesive cures.
- For extra performance, add a second layer with staggered seams, taping the edges with foil tape. Two layers of 2-inch polyiso gets you roughly R-13 — a massive upgrade from bare plywood at about R-1.
- If the panel is thin or flimsy, screw a second plywood skin to the foam sandwich for rigidity — the panel needs to support its own weight plus the insulation every time it’s lifted.
For pull-down stairs:
The stair door panel gets the same foam-board treatment on its attic side, but keep the total added thickness modest — too much and the stairs won’t fold closed. About 1 to 2 inches of foam board is the practical limit on most units. Also insulate the stair “box” if the folding mechanism leaves the sides exposed: glue foam board to the interior sides of the stair frame.
The easy alternative: pre-made attic stair covers — insulated “tents” that sit over the stairs in the attic and zip or velcro closed. They cost more than DIY foam board (typically in the $50–150 range) but install in minutes and work well. If your stairs are an odd size or you just want the job done today, they’re a fair trade.

Step 4: Weatherstrip the Frame
With the panel insulated, seal the gap between the panel and the frame — this is where air whistles through.
- Clean the frame surfaces where weatherstripping will stick.
- Apply self-adhesive compressible foam weatherstripping to the frame’s landing surface (the ledge the panel sits on), all the way around. For pull-down stairs, apply it to the frame where the door closes against it.
- Close the hatch and check the compression — you want the weatherstripping to squash slightly, forming a continuous seal, without making the hatch hard to close.
- For scuttle panels that sit loose, add a simple latch or hook-and-eye on two sides to hold the panel firmly against the weatherstripping. Gravity alone rarely seals well.
Step 5: Test and Finish
Close everything up and verify your work:
- The incense test: on a cold or windy day, hold a lit incense stick near the hatch edges from below and watch the smoke. Steady, straight smoke means a good seal; smoke that wavers or gets sucked upward means you still have a leak.
- The touch test: on a cold morning, touch the ceiling around the hatch. Before the fix, the hatch area often feels noticeably colder than the surrounding ceiling. After proper insulation and sealing, the difference should be minimal.
- The flashlight test: from the attic with the room lights off below (or vice versa), check for light leaking around the frame.
Label the hatch panel if you like — a small note saying “insulated, please replace carefully” helps the next person (a cable installer, an HVAC tech) put it back properly instead of leaving it ajar.
Insulation Options Compared
| Material | Approx. R-value per inch | Pros | Cons |
|---|---|---|---|
| Foil-faced polyiso board | ~R-6.5 | Highest R-value per inch; light; easy to cut | Pricier per sheet; performance dips slightly in extreme cold |
| XPS board (pink/blue) | ~R-5 | Good R-value; moisture-resistant; widely available | Slightly thicker needed for same R-value |
| EPS board (white beadboard) | ~R-4 | Cheapest option | Lower R-value; crumbly to cut |
| Fiberglass batt (glued to panel) | ~R-3.2 | Cheap; familiar | Compresses easily; falls off panels; itchy to handle |
| Pre-made stair cover tent | Varies (often ~R-10+ total) | Fastest install; purpose-built | Highest cost; must match your stair size |
For most hatches, foil-faced polyiso is the sweet spot: two 2-inch layers give you roughly R-13 in about 4 inches of thickness, and a single 4×8 sheet (typically under $30–40 at a home center, prices vary) covers several hatches with plenty left over.

Pro Tips
- Do this on a cool day. Attics are brutal in summer heat. October — right when you’re doing the rest of your fall weatherization — is ideal.
- Mind the fire code. If your hatch is in a garage ceiling, building codes often require a fire-rated cover. Check local code before swapping materials — you may need a fire-rated assembly rather than plain foam board.
- Don’t block ventilation. Insulate the hatch, not the attic vents. Soffit and ridge vents need to stay clear for the roof assembly to breathe.
- Photograph before you close up. A quick photo of the insulated hatch from the attic side is useful for future buyers, energy auditors, or your own memory.
- Combine with a full attic check. While you’re up there, look for compressed or missing insulation elsewhere, daylight around penetrations (plumbing vents, chimneys, recessed lights), and signs of moisture. One trip, many fixes.
Common Mistakes
- Insulating without air sealing. The most common half-job. Foam board on a leaky frame still leaks.
- Using duct tape on foam edges. It fails within a year in attic temperature swings. Use foil tape.
- Piling loose fiberglass on the panel. It compresses, slides off, and does almost nothing after the first time the hatch is opened.
- Making the panel too heavy or thick. On pull-down stairs especially, overbuilding means the stairs won’t close — or the springs can’t hold the door.
- Forgetting the weatherstripping. The panel-to-frame gap is often the biggest single leak. Insulation plus no weatherstripping is a job half done.
- Stepping through the ceiling. Always step on joists or the frame. A foot through drywall turns a one-hour energy project into a drywall repair project.
Frequently Asked Questions
How much does it cost to insulate an attic hatch?
Very little. DIY with rigid foam board, weatherstripping, and caulk typically runs $20–50 in materials (prices vary by store and region) and about an hour of labor. A pre-made stair cover tent costs more — typically in the $50–150 range — but installs in minutes.
What R-value should an attic hatch have?
Aim to match the rest of your attic floor as closely as practical. Two layers of 2-inch polyiso (roughly R-13) is a realistic, high-performing target for a scuttle panel. For pull-down stairs, 1–2 inches of foam board is the practical limit before the stairs won’t close.
Can I just lay a fiberglass batt over the hatch?
You can, but it performs poorly. Batts compress under their own handling, slide off the panel, and leave the edges unsealed. Rigid foam board glued to the panel stays put and seals at the edges with foil tape — it’s the better approach for a hatch that gets opened.
Do I need to insulate the attic stairs too, or just the door?
Both, ideally. The door panel gets foam board on its attic side, and the stair frame’s interior sides benefit from foam board as well. A pre-made tent cover handles the whole assembly at once, which is why they’re popular for pull-down stairs.
Will insulating the hatch really make a noticeable difference?
On its own, it’s a modest but real improvement — the bigger win is that it stops undermining the rest of your attic insulation. Combined with air sealing, it’s consistently one of the highest return-on-effort projects in home energy audits. You’ll most notice it as reduced drafts and a hallway that no longer feels colder than the rest of the house.
Is this a good DIY project for a beginner?
Yes — it’s genuinely beginner-friendly. Cutting foam board with a utility knife, applying adhesive, and sticking on weatherstripping require no special skills. The main safety notes: wear a dust mask in the attic, step only on joists, and do it on a cool day.
One Hour, Decades of Payoff
The attic hatch is the kind of project that makes you wonder why you waited. An hour’s work, a few dollars in foam board and weatherstripping, and one of the leakiest spots in your home’s thermal envelope is sealed for good. Every heating bill and every cooling bill from here on out is a little bit smaller because of it.
Add it to this year’s fall maintenance routine — and while you’re in efficiency mode, our guide to lowering your electricity bill covers the other high-return October projects.
And this is just one piece of the October weatherization puzzle — pair it with winterizing your outdoor faucets and weatherstripping your front door for a full weekend of draft-proofing.

Welcome to Homeblesh! I'm a professional content writer with over five years of experience creating well-researched, practical, and reader-focused content for clients on Upwork and Fiverr. Now, I've dedicated my expertise to building Homeblesh, where I share helpful guides, honest recommendations, and actionable tips based on careful research and industry knowledge. My goal is to provide accurate, trustworthy information to help you make informed decisions while delivering clear, useful, and easy-to-understand content.
- Muhammad Imran

- Muhammad Imran

- Muhammad Imran

- Muhammad Imran


