


Have your once-beautiful hardwood floors lost their luster, whispering tales of countless footsteps and the wear of time? Perhaps you’ve stood in a friend’s home, admiring their gleaming floors, and felt a quiet longing for your own to be reborn.
This isn’t just about a simple renovation; it’s about uncovering the hidden potential beneath your feet and discovering how hardwood floors add value and soul to your living space.
You might be weighing the cost to refinish hardwood floors, wondering about the investment per square foot, or debating if you need a heavy-duty floor sander to sand the floor yourself.
Rest assured, whether you choose to fully refinish your hardwood floors or explore options like refinishing hardwood floors without sanding, you can transform your home.
Get ready to learn how to refinish hardwood like a pro, guided by essential tools, clever tips, and the best manufacturer’s instructions for a truly stunning finish. Refinishing a hardwood floor is a journey that is more rewarding than you can imagine.
The Vision & The Decision – Is Refinishing Right for You?
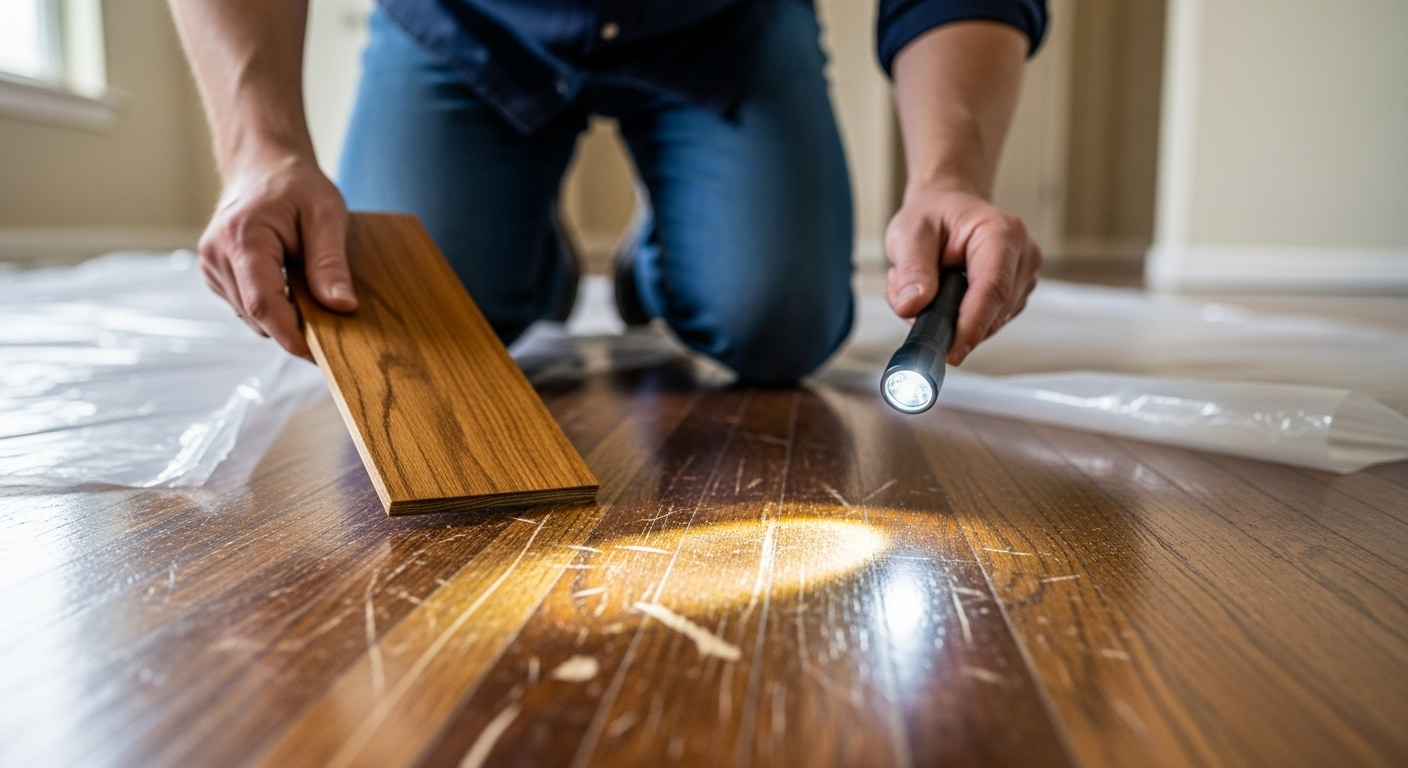
Before diving into the satisfying world of wood floor refinishing, take a moment to assess your floors truly. Do you see a scattering of scratches, a general dullness, or perhaps areas of water damage and uneven wear? These are the whispers telling you your floors need refinishing. But how deep does the story go?
Can these issues be resolved by sanding down to the bare wood and applying a new polyurethane finish, or is it time to consider a full replacement? Often, the answer lies in revealing the true color of the wood underneath. You might even want to change the color with a different wood stain!
If refinishing is the path you choose, understand the commitment that comes with it. This isn’t just a quick refresh. It involves clearing the room completely, using plastic sheeting to seal off doorways, and preparing for the temporary disruption.
You’ll need to work meticulously with sandpaper across the floor, especially around the edges of the room, and apply the new finish carefully with an applicator.
For specific types, such as oak floors, the process is well worth the effort, as it transforms your space. Wondering how much it costs? While costs vary, the reward of beautifully finished floors usually outweighs the expense, breathing new life into your home without the need for a complete replacement.
Tools of Transformation for Your Floor

Stepping onto a battered hardwood floor is like opening an old storybook, each scratch and scuff a chapter waiting to be rewritten.
If you are battling discoloration or dreaming of that showroom shine, the right tools are your trusted characters in this transformation tale.
Essential Tools & Their Roles
- Drum Sander (and Dust Bag): The hero for the entire floor, tackling large, flat areas to strip off the old finish and remove dents. Its powerful drum and attached dust bag help keep dust at bay, just be sure to empty it regularly to prevent dust buildup.
- Edge Sander: Our sidekick for corners and edges where the drum sander can’t reach. It ensures no patch of wood is left behind when you apply your water-based polyurethane or give it a new coat of stain.
- Orbital Sander: Ideal for detail work or smoothing out stubborn spots of discoloration before applying a finish to the floor.
- Sandpaper Grits (36–120): A progression from coarse to fine that prevents buffing the floor too aggressively and helps extend the life of your wood by avoiding unnecessary gouges.
- Shop Vacuum: Equipped with a high-efficiency filter, it effectively removes sanding dust. Use plastic sheeting to seal doors and prevent dust from escaping into adjacent rooms.
- Tack Cloths: The final guardian to remove any lingering grit before staining or finishing, always wipe down the entire floor for a flawless base.
- Stain & Finish Applicators: Rags, foam pads, and a lambswool roller ensure an even finish, whether you brush on a rich stain or roll on water-based polyurethane.
- Painter’s Tape & Plastic Sheeting: Protect trim and walls to add value to your home by creating crisp lines and preventing drip marks.
- Safety Gear (Respirator, Goggles, Ear Protection, Knee Pads): Protect yourself as you restore their beauty. Refinishing hardwood floors is rewarding, but only when you’re safe and comfortable.
Equipped with these tools, you’ll not only restore your wood’s former glory but also answer “how much does it cost?” in satisfaction, because every dollar spent adds years to your floors and value to your home.
Step-by-Step Hardwood Floor Refinishing
Stepping into a room with tired, scratched planks is like opening a timeworn book you can almost hear its stories begging to be refreshed. To refinish hardwood floors is to become both storyteller and artisan, transforming each dent and discoloration into a fresh chapter of beauty.
Whether you’re a DIY homeowner wondering “how much does it cost?” or simply eager to spray the floor with a gleaming new coat, here’s your step-by-step map to restore their beauty and add value to your home.
1. Preparation
- Clear & Seal: Remove furniture and rugs, then use plastic sheeting to seal doors, vents, and outlets to prevent dust from escaping.
- Baseboard Removal (Optional): Take off baseboards for edge-to-edge sanding coverage.
2. Sanding
- Initial Pass (36-grit): Run the drum sander across the entire floor, collecting dust in the dust bag and minimizing dust accumulation.
- Edge Work: Switch to an edge sander for corners and tight spots.
- Progressive Grits (60, 80, 100): Sand again to smooth dents and eradicate old finish.
- Final Buff (120-grit): Use a buffer or sanding screen to polish out imperfections.
3. Clean-Up
- Vacuum Thoroughly: Remove all sanding grit with a shop vacuum.
- Tack Cloth to Remove Residue: Wipe the entire floor to ensure a spotless base.
4. (Optional) Water Popping & Staining
- Lightly mist with water or denatured alcohol to raise the grain for deeper stain penetration.
- Apply the stain with a rag or brush, wipe away excess, and let it dry.
5. Finish Coats
- First Coat of Water-Based Polyurethane (or your chosen type of finish): Roll or spray the floor and let cure per instructions.
- Light Sand & Recoat: Sand between coats with 220-grit, then apply a new coat three coats is standard to extend the life of your wood.
- Buffing the Floor: Once cured, buff to achieve that showroom shine.
6. Final Touches
- Clean walls, reinstall baseboards, and move furniture back, then marvel at how you’ve breathed new life into every plank, adding years of beauty and value to your home.
The Alchemist’s Touch – Stains & Finishes
Like any true alchemist, you’re about to transform ordinary wood into a gleaming masterpiece. In “The Alchemist’s Touch,” stains and finishes become your philosopher’s stone.
Each hue and protective layer working in harmony to refinish hardwood floors and whisper new life into every grain. Ready your tools, clear away the old finish, and prepare to conjure a floor that dazzles.
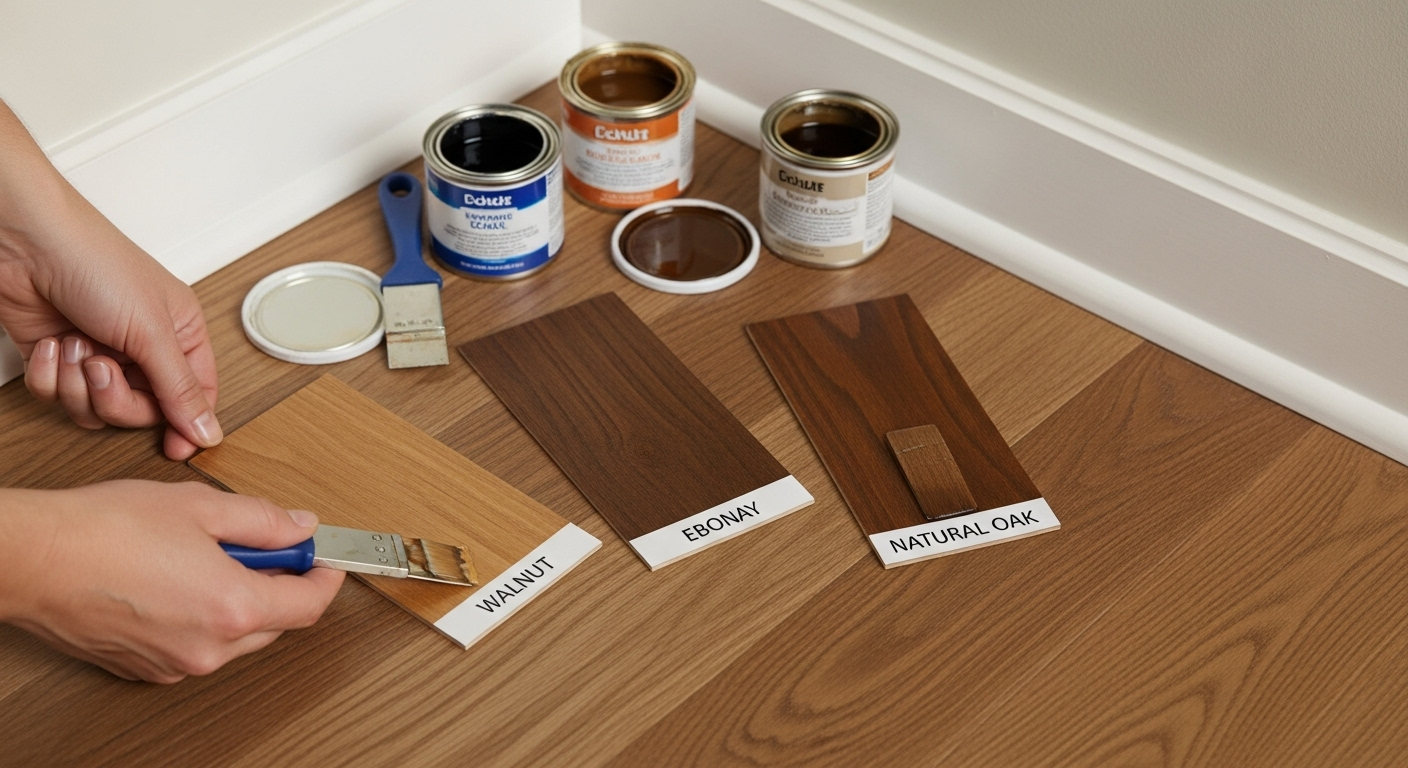
1. Choosing Your Hue
- Exploring Stain Options: From amber honey to ebony night, stains react uniquely with oak, maple, or cherry. Oil-based dyes deepen grain contrast, while water-based tints offer crystal clarity.
- Testing in Secret Corners: Always remove base trim (or gently work behind furniture) and apply a dab of stain with a putty knife or rag. Inspect after it dries for true color payoff.
B. The Art of Staining
- Even Application: Use a lint-free cloth or brush, moving in the direction of the wood’s grain. Steel wool slathered in stain can reach knots and crevices.
- Wiping Off Excess: Wait just a minute, then buff away surplus with a clean rag to avoid sticky spots or uneven blotches.
- Drying Times & Ventilation: Allow each layer to rest for the recommended drying time, usually 6–12 hours for oil-based stains and less for water-based stains. Open windows or run fans for the best circulation.
C. The Protective Shield: Applying Polyurethane
- Types of Polyurethane: Oil-based yields amber warmth; water-based stays clear. You might even explore natural tung oil for a hand-rubbed glow.
- First Coat Ritual: Pour sparingly, then roll out the paint thinly and evenly, avoiding puddles.
- Screening Between Coats: Once dry, gently scuff with a fine-grit screen to remove dust nibs and improve adhesion.
- Subsequent and Final Coats: Repeat for a second coat (and a third, if desired), allowing each layer ample time to dry. End with a final buff for a flawless floor finish that will stand the test of time.
The Master’s Secrets – Tips and Tricks for a Flawless Finish
Stepping into the artist’s studio, imagine your face as a treasured hardwood floor, each pore a grain ready to be revealed in its full glory. “The Master’s Secrets” will guide you to a flawless finish, blending makeup alchemy with the patience of a refinisher who knows when to remove the old finish and let fresh beauty shine.
- Skin Preparation (Remove Base Imperfections):
Begin by “refinishing” your canvas, thoroughly cleansing it, then hydrating to fill in fine lines, much like using wood filler to seal cracks. Apply a primer as you would tung oil, smoothing it over every pore; allow it to dry for hours before moving on. For extra polish, buff stubborn flakes with fine steel wool to soften the scrub. - Foundation Application (First & Second Coat):
Choose a foundation that matches your undertone. Think of your first coat as the initial floor finish: apply sparingly in the center, then blend outward. Once dry, add a second coat only where extra coverage is needed, avoiding a heavy, cakey look just as you’d avoid overloading a sander with coarse grit. - Concealing & Correcting (Concealer as Wood Filler):
Target dark circles and blemishes with concealer, the makeup equivalent of a putty knife smoothing wood filler. For deep discoloration, color correct first, like sealing knots in the grain, then blend seamlessly. - Setting Your Makeup (Final Floor Finish):
Lock in your masterpiece with translucent powder and a mist of setting spray, akin to applying a durable polyurethane floor finish. Use a fluffy brush (or a lambswool roller) to dust away excess and prevent dust from settling during application. - Pro Tips (Prevent Dust & Extend Life):
Cover surrounding areas with plastic sheeting to seal doors and keep dust at bay. Always remove base buildup between steps, just as you’d empty a dust bag, and practice blending to restore their beauty each time you touch up.
Conclusion
As you step back and admire the grand reveal, your once-worn planks now gleam with a flawless floor finish, proof that every hour spent stripping away the old finish, gently softening scratches with steel wool, and filling gaps with wood filler and a trusty putty knife was worth it.
You’ve applied a careful second coat of water-based tung oil, letting it rest for hours to dry, and even tackled the edges after you remove base molding.
This isn’t just a surface; it’s a fresh chapter in your home’s story. As an empowered homeowner, revel in the lasting beauty and warmth you’ve lovingly restored.


